


The latest issue of Aeromodeller is now available at good model shops, newsagents and online (pocketmags.com). It is a bumper printed edition with 2 free pull-out plans; the EE-ZEE Trainer/Sports stunt CL model and the Mini V F1H (A1) competition winning FF glider. Also reviews of the Parra Tiger T3 (2.5cc) and T4 (3.2cc) competition engines, FF and CL scale articles, and the usual mix of diverse and interesting contributions for the discerning aeromodeller.
The following items are extra to the magazine.
Arne Hende Story
The concluding part of the Arne Hende story covers some of his multi-cylinder engines. We didn’t have space for this photo of the Hende scale DH Cirrus engine next to an ED Bee and replica BMP Moth for scale, or the shot of the Elf twin box.
Free Flight Retrieval – On the Flying Field. How to use a GPS. (Martin Dilly and Mike Fantham)
People have different preferences for both the GPS unit they use and how they use it. Rather than covering every variation I’ll concentrate on the Garmin GPS-12 which I’ve used for around ten years now. This is no longer made, but they are usually available on E-Bay at reasonable prices, say £20-50.
My preference is to set a precise line from the launch point to a long way past the distance you estimate the model to be and for the screen to display this, along with the cross track error; this is the distance you are left or right of the correct line and is very useful when you are in the car or walking round some obstruction trying to get back on the right line for the search.
Though these instructions (deduced for me by Mike Fantham) are specific to the GPS-12, the principles will be similar for other types.
1) Take a compass bearing on the last sighting of model
2) Hold red key on GPS12 down for 3 seconds to start the device
3) Wait for the Satellite page and then the Position page to appear; this may take a minute or two while the unit acquires enough satellites to know its exact position.
4) Press MARK key to mark the current position
5) ENTER
6) Press PAGE till the main menu appears
7) Using 4-arrowed centre key, highlight WAYPOINT
8) ENTER
9) Highlight the top line
10) ENTER
11) Name downwind waypoint (e.g. ‘MD1’) using 4-arrowed key
12) ENTER
13) Highlight figure under DST
14) ENTER
15) Insert a nominal downwind range well beyond the model’s likely position; I use10 miles
16) ENTER
17) Highlight figure under BRG
18) ENTER
19) Insert the bearing to model
20) ENTER
21) Highlight DONE?
22) ENTER
23) Press the GOTO key
24) Highlight the downwind waypoint name
25) ENTER
26) The Highway page will appear. Go towards the model; steer in direction of the angling ’highway’. You are on line when the ’highway’ is vertical.
27) XTK at the bottom of the frame indicates the distance left or right of track in miles. (0.01 = 53 feet) (This mode has to be set up in advance)
Have a spare set of batteries with you when you set out, along with your tracker and binoculars and a transceiver if you use one.
-
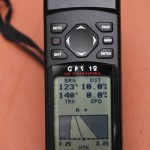
- The Garmin GPS-12
-
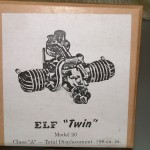
- Box for the Arne Hende Elf Twin replica
-
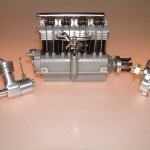
- Arne Hende, De Havilland Cirrus scale engine
-
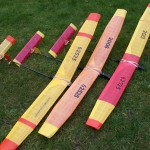
- Mini V F1H competition glider is one of the Free Plans

